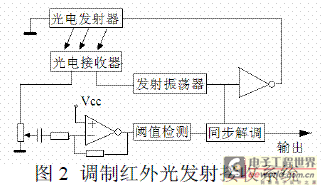
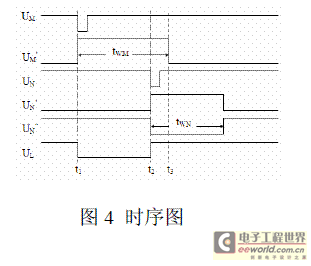
introduction This article refers to the address: http:// The vehicle should travel at a speed that matches the road conditions on the road. It is too fast to cause an accident. Too slow will become a stumbling block for the following vehicles. However, there are often individual drivers who do not drive at the prescribed speed and violate the regulations, resulting in frequent accidents. In order to obtain evidence and correct the violations, the traffic control department currently uses radar speed measurement systems (using the Doppler effect) to conduct speed testimony on illegal vehicles and impose penalties. Recently, an anti-radar speed measuring device called "electronic dog" has appeared on the market. When the device is close to the radar speed measuring area, it can capture the information of the radar speed measurement and alarm in advance, so that the illegal vehicle escapes punishment, and the hidden danger still exists. Therefore, it is especially necessary to study a reliable speed measurement and management system that can accurately measure the speed of a car without being discovered by an "electronic dog." The new speed measuring system with infrared light sensor and ARM as the core component studied in this paper will not be discovered by the “electronic dogâ€. It can not only identify the speed V of the car, but also measure the speed exceeding the upper limit speed (Vmax). Information such as the magnitude (+â–³V) or the magnitude (-ΔV) below the lower limit speed (Vmin), according to the information, drives the forensic system (printing, photography) work as appropriate, which can effectively improve the traffic control. 1 System working principle The system consists of a modulated infrared light sensor [1], a Philips LPC2294 ARM embedded processor, a color LCD with a touch screen, and an alarm camera, as shown in Figure 1. In Figure 1, the two points M and N are two points on the side rail side of the roadside. They are equipped with an infrared light-emitting tube that can emit 38KHz, and emit modulated infrared light all the way. The modulated infrared light is received by the photoreceivers placed at the corresponding two points M', N' on the other side guardrail to form a photo-controlled speed measuring zone. When a vehicle passes through the light control speed measuring zone, the light emitted by the M point is first blocked, and the first photodetector M-M' converts the optical signal into an electrical signal and sends it to the signal conditioning circuit, which is amplified, shaped, and sent to ARM processor. ARM receives this trigger signal, turns on the internal counter to start counting, and the value of time t increases accordingly. When the car reaches the N point, the second photodetector N-N' converts the optical signal into an electrical signal and sends it to the ARM processor via the signal conditioning circuit to stop counting, and the value of t is determined. The velocity V is obtained by dividing the distance L between the two points M and N by t. If the calculated V value is within the set safe speed range, the display shows the current safe speed value, the camera and alarm circuit will not work; if the V value is outside the set range, the speed offset will be calculated. V = Vmax - V, at the same time, the vehicle is overspeeded, and the camera and alarm circuits are activated. Similarly, if the vehicle is V 2.1 Photoelectric emission receiving system The principle of the photoelectric emission receiving system is shown in Figure 2. The oscillator generates a signal with a frequency of 38 kHz, which drives the infrared tube to emit light. The photoelectric receiver receives the light pulse emitted by the infrared light-emitting tube, and the received light pulse signal is connected to the input end of the detector through the adjustment potentiometer [2]. The received modulated optical pulse signal is sent to an amplifier for amplification, and after being detected by the threshold value, it becomes a logic level pulse which is synchronously outputted with the synchronous oscillator, and then is synchronously demodulated by the pulse to obtain a photoelectric signal related to the motion state of the vehicle. And buffered output. 2.2 Signal reception and timer work As shown in Figure 3, when no vehicle passes through the light-controlled speed measurement zone, M', N' The point can always receive 38KHz modulated infrared light, both output high level, temporary steady state The circuits are in steady state. The output of gate G is logic 1, and UL is always high. when When a vehicle passes through the light-controlled speed measurement zone, the light emitted by the M point is first blocked, and the UM is The high level first goes low, and the transient steady-state circuit 1 is triggered to enter the transient steady state, such as This is shown after the time t1 in Figure 4. At this time, UM' is low, G gate is triggered, Output UL is low. ARM system CAP1.0 captures UL from high to low Level, falling edge capture, automatic loading of T1TC value transfer to capture register T1CR, and generate an interrupt, enter the interrupt service subroutine, read the value of T1CR and protect Save. Then, when the car reaches the N point - that is, at time t2, the transient steady state circuit 2 Triggered, UN' goes high, and goes through the NOT gate to go low UN''. At this time G Gate output changes from low to high, ARM's CAP1.0 captures UL low Go high, capture on rising edge, automatically load the value of T1TC into the capture register T1CR, and generate an interrupt, enter the interrupt service subroutine. Calculate two capture deposits The difference N between the T1CR and the operating frequency f of the counter is obtained by the vehicle passing two tests. The time difference between point M and point N is t2-t1. 2.3 ARM core board and touch display system The system core board adopts DEVICEARM2200 industrial control board, which is embedded with Philips' LPC2294ARM7TDMI-S embedded processor. The maximum frequency is 60MHz, and it has 8M PSRAM memory and 16M NANDFlash. The performance fully meets the requirements of high-speed vehicle speed measurement system. Due to its small package and low power consumption, it can be battery-powered, making it ideal for use in the field without an external power supply. The circuit connection is shown as in Fig. 5: the display adopts 320×240 color LCD screen, connect AB0 to AB16 of LCD controller S1D13503 to address bus A1 to A17 of LPC2294, operate in 16-bit bus mode; data bus DB0 of S1D13503 to DB7 is connected to LPC2294's external memory data lines D0 to D7, DB8 to DB15 are connected to VDD for 8-bit data bus connection to LPC2294; its hardware configuration is completed by two high-speed CMOS static memories IS61C1024 to S1D13503's VD0 to VD15. The four-wire resistive touch screen detects the touch signal and converts the analog signal to position coordinate data via the touch screen controller FM7843 and passes it to the LPC2294 for processing [3]. 3 system software design 3.1 uclinux system porting Although uclinux currently supports the ARM architecture without MMU, the specific code of the LPC2294 chip needs to be added or modified because the ARM processor chip storage system is different, the on-chip peripherals are different, and the interrupt system is different. ]. Including: add chip model, boot code and data structure to describe the model; modify the interrupt system related code and add irq.h, irq.c and irqs.h files in the include/asm-armnommu/arch-lpc/ directory to achieve System interrupt; add dma.h, memory.h, processor.h and other header files in the include/asm-armnommu/arch-lpc/ directory, and define the clock, serial port, interrupt controller and other registers in the hardware.h file. Address; create file time.h, timex.h and serial.h in the include/asm-armnommu/arch-lpc/ directory to implement port serial port driver porting; modify config.in file settings in arch/armnommu/config directory Menu configuration and modify files such as mach-lpc/makefile, linux-2.4.x/makefile, and arch/armnommu/makefile. 3.2 Device Driver Design Since the uclinux 2.4.x kernel is non-preemptive, the process time slice is 10ms, and its real-time performance is not high. However, since there is only one high-real-time task in the system--the vehicle captures the signal, the TIRF1 device driver can operate the timer on the LPC2294 to achieve the bilateral edge capture of the CAP1.0 pin signal. The TIMER1 device driver consists of a driver initialization function, a clear function, a device information structure, open, release, read, ioctl, and other interrupt service routines. When loading the kernel module, the uclinux system first executes the initialization function timer1_init(), registers the character device by calling result = register_chrdev (MAJOR_NR, DEVICE_NAME, &timer1_fops); and determines whether the device registration is successful according to the return value result; when the kernel unloads the module, it executes Clear the function timer1_cleanup( ) and call out the character device by calling unregister_chrdev(MAJOR_NR, DEVICE_NAME). The device information structure is used to describe the open, release, read, and other operations of the device. When the system and the application first use the timer, the timer1_open(struct inode *inode, struct file *filp) method is first called to request_irq. (IRQ_timer1, timer1_irq_handle, SA_INTERRUPT, "my" DEVICE_NAME, NULL) function to register the interrupt response function, configure the timers T1IR, T1PR, T1TC, T1TCR and other registers to complete the timer initialization, using the interrupt switch functions local_irq_save() and local_irq_restore() Control the critical section; eventually the uclinux system receives the hardware interrupt and calls the interrupt service routine; when the system and the application no longer use the timer, call timer1_release(struct inode *inode, struct file *filp) to close and release. The interrupt service routine timer1_irq_handle(int irq, void *dev_id, struct pt_regs *regs) completes clearing the interrupt source, resetting the timer counter, and reading the value of the counter in the capture register via the macro inl (T1CR) provided by uclinux and calling the system function copy_to_usr ( ) Copy data from kernel space to user space. Finally, copy the device driver timer1.c to the linux-2.4.x/driver/char directory, and add the function timer1_init() to timer1.c to register the device. Add the timer1_init() external function description to the mem.c file, add the timer1_init() call to the chr_dev_init() function, and compile the new kernel [4]. 3.3 MiniGUI transplantation At present, the common GUI systems under the embedded Linux platform are: MicroWindows, QT/Embedded, XWindows, OpenGUI, MiniGUI and many other options. Considering many factors such as ease of use, cross-platform and development cost, this paper uses the MiniGUI of Feynman to realize the development of GUI human-computer interaction graphical interface [5]. In order to facilitate debugging, the VMware software is used to build the host of the linux platform under the windows system, enter the linux environment, download the function library source code package libminigui-str-1.6.2.tar.gz and the resource file package from Minigui-res-str-1.6.tar.gz and expand. In order to realize its cross-platform feature, MiniGUI uses GAL (Graphics Abstraction Layer) and IAL (Input Abstraction Layer) to isolate the upper layer of MiniGUI from the operating system. Therefore, first create the lcdgal.c file, refer to the native graphics engine data structure and the Framebuffer driver to write the interface function according to the GAL interface; then put the LCD driver lcddriver.clcddriver.h and the LPC2294 header file lpc2294.h under libminigui / Modify the Makefile.am file in the src/gal/native directory. Add ialinput.h and ialinput.c in the /src/ial directory of libminigui to write the IAL interface function, add the touchscreen controller drivers fm7843.c, fm7843.h to the /src/ial directory, and modify the Makefile.am file. Join the MINIGUI extension library libmgext support, cross-compile in Threads mode and link the resulting MiniGUI static link library with the cross-compiled user application to generate the target file that can be run on the target board, and finally on the transplanted uclinux system. Install the resource files needed to run MiniGUI. 3.4 User Interface Design The user interface consists primarily of a main form for displaying speed information and a dialog set for vehicle speed alarms. Using MniniGUIMain( int argc, const char* argv[ ] ) as the entry point, define the display area, use CreateThreadForMainWindow() function to create two concurrent threads, define the thread's entry function address and return the thread identifier; configure in the main thread Complete the initialization of timer1, create the main form via hMainWnd =CreateMainWindow( &Createinfo) and configure the properties of Createinfo. Call ShowWindows( hMainWnd, SW_SHOWNORMAL ) to display the form as the user's main interface and finally enter the message loop. The monitoring thread and the main thread start at the same time. After that, the monitoring thread monitors the speed information data in real time in the background, and sends a corresponding message to the main thread through SendMessage( ). Message processing and overspeed alarm determination can be implemented in the main form window procedure function SpeedWinProc( ). The SET and About drop-down menus in the main form are implemented by the CreatMenu( ) and CreatePopupMenu( ) functions, which are used to pop up the speed setting dialog and the system description dialog respectively. Assign the menu handle to the hMenu property of the main form and add the processing code of the corresponding menu in the form procedure function. When the menu is clicked by the manager, the form will receive the corresponding MSG_COMMAND message, and the system executes the corresponding menu according to the message. The speed setting handler or system description display program below. In the speed setting dialog, the button uses the normal "OK/OK" button CTRL_BUTTON, and the two static boxes CTRL_STATIC identify the functions of the two single-line edit boxes CTRL_SLEDIT: "Upper speed setting" and "Lower speed setting". Two edit boxes are used to receive the upper and lower speeds entered by the manager. The speed setpoint in the edit box is entered by the numeric button implemented by the CTRL_COOLBAR control via the MSG_GETTEXT message. The creation of each control is achieved by calling the Createwindow function with the name of the control class. 4 Conclusion Modulated infrared light vehicle speed recognition system can not only accurately measure the speed of the car, but also its speed measurement information can avoid the "electronic dog" type of anti-velocity device capture, making it difficult for illegal vehicles to evade punishment, and improving the quality of traffic control. It plays an important role in eliminating hidden dangers of accidents and ensuring the safety of people's lives and property, and can be used in other speed measuring occasions. The application prospect is very broad. Since the sensor head is only sensitive to 38 kHz modulated infrared light, other infrared light has almost no effect on it, so the system has strong anti-interference ability. The system adopts ARM embedded processor, uclinux operating system and touch screen. It not only has good human-computer interaction, but also has strong upgrade and expansion capabilities, stable work and great application prospects. Ningbo Autrends International Trade Co.,Ltd. , https://www.supermosvape.com
2 system hardware design