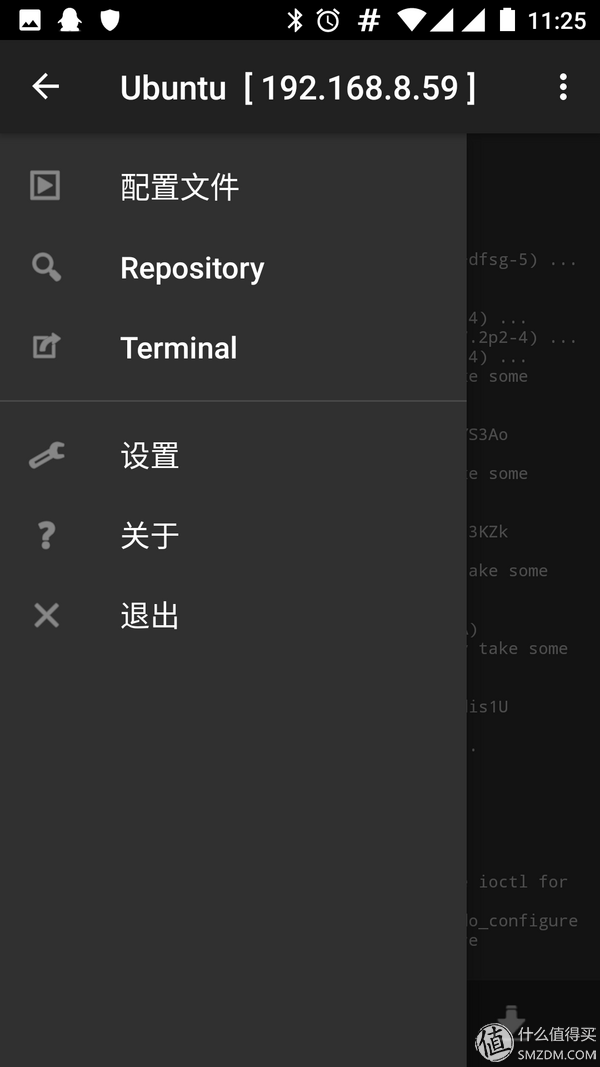
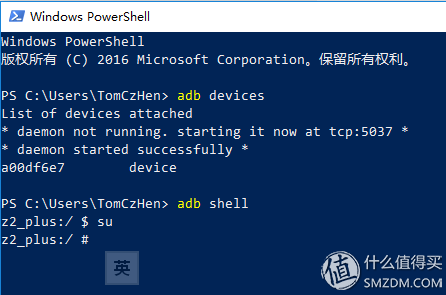
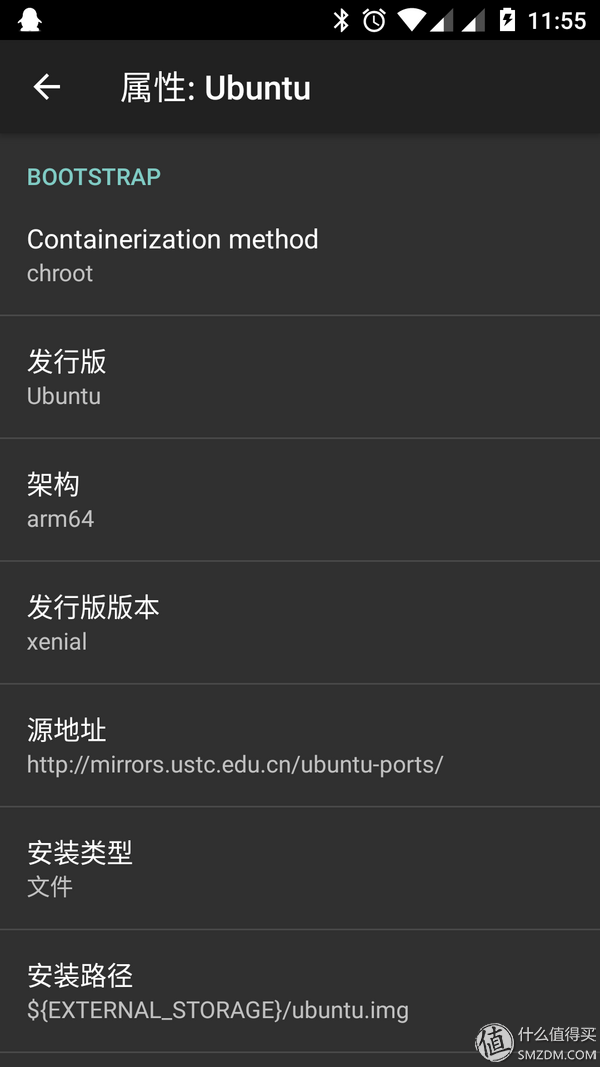
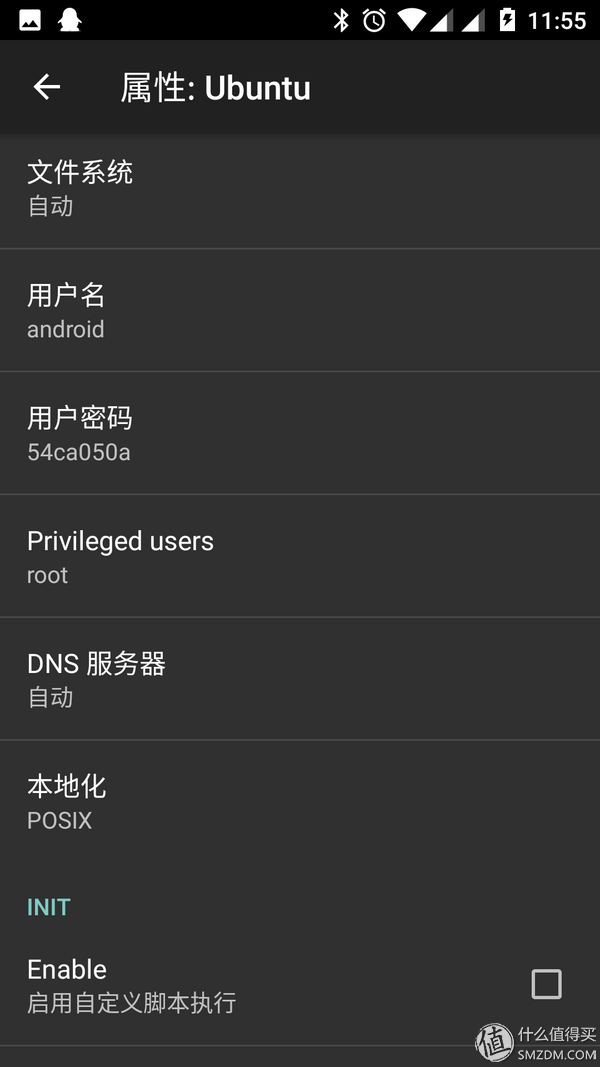
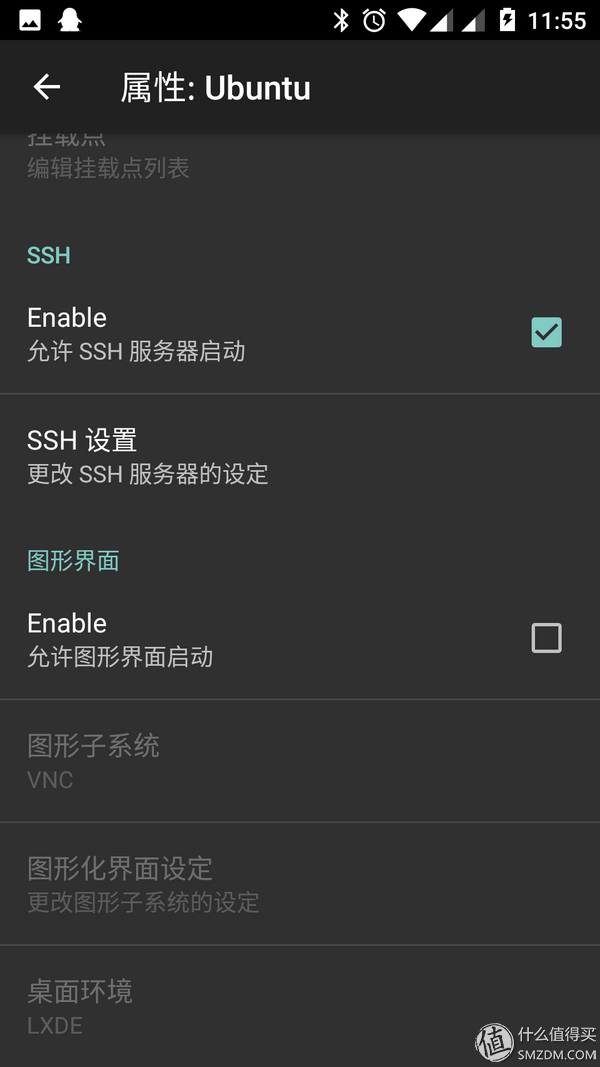
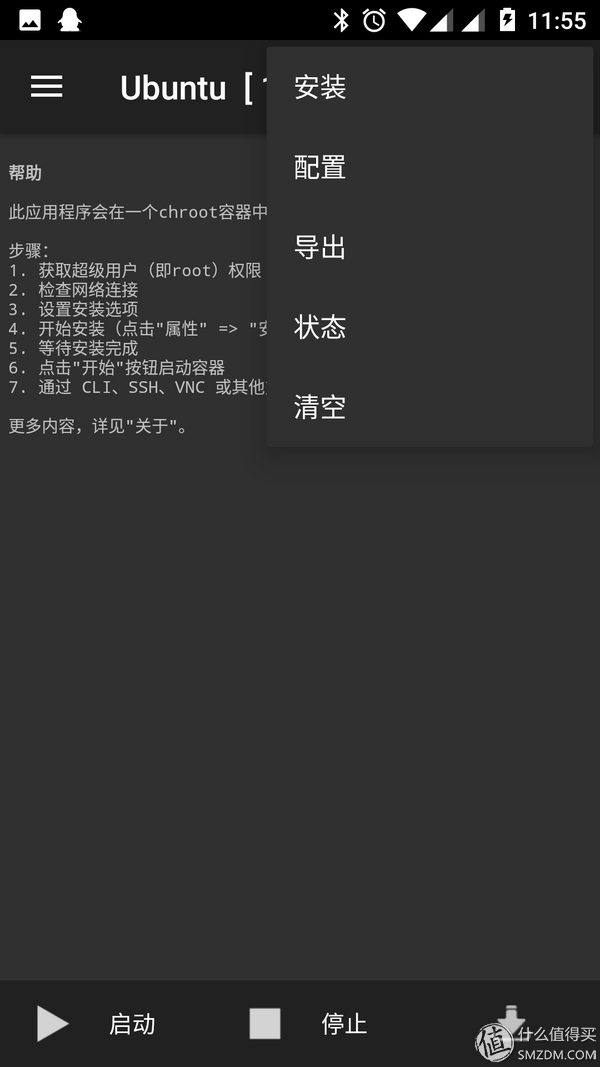
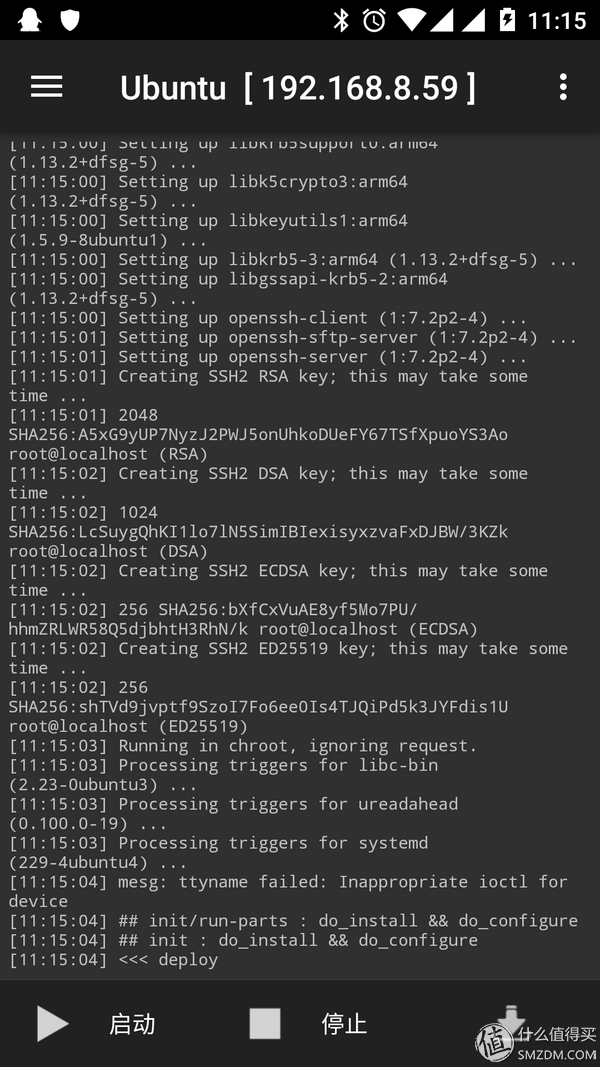
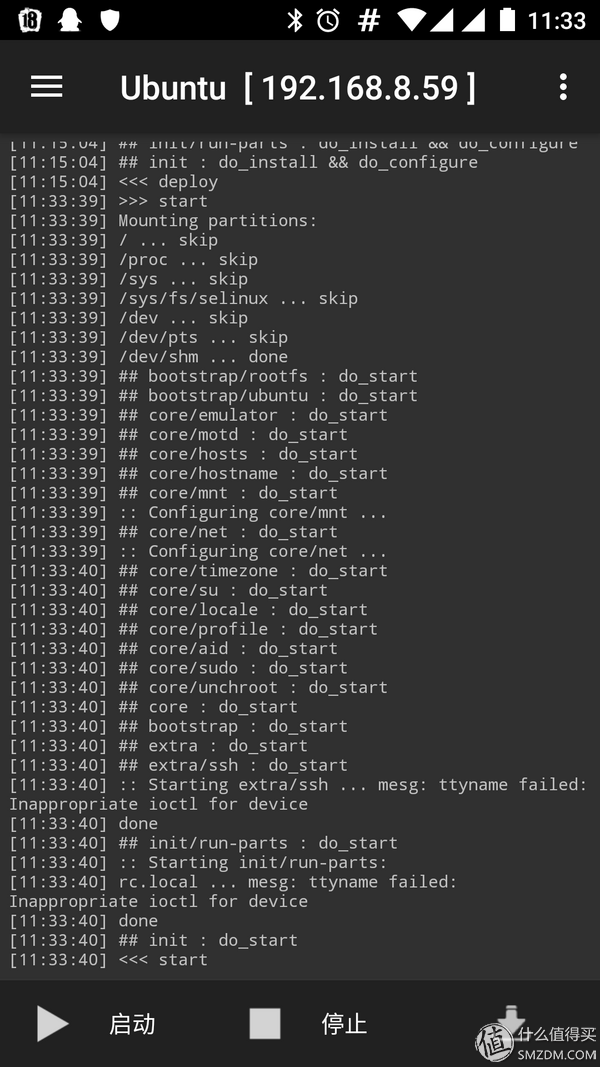
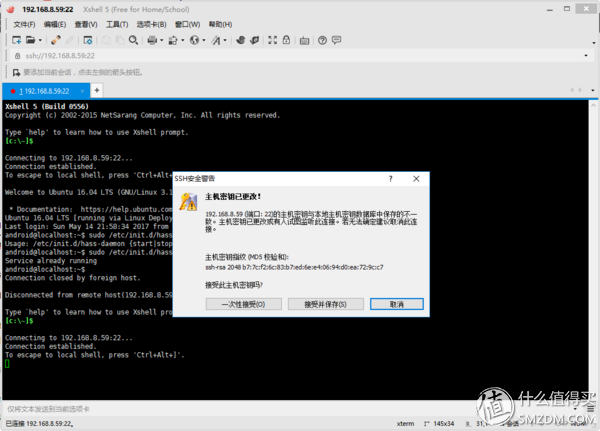
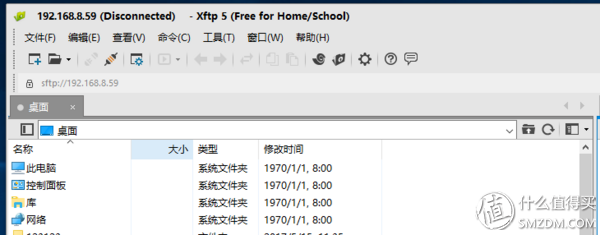
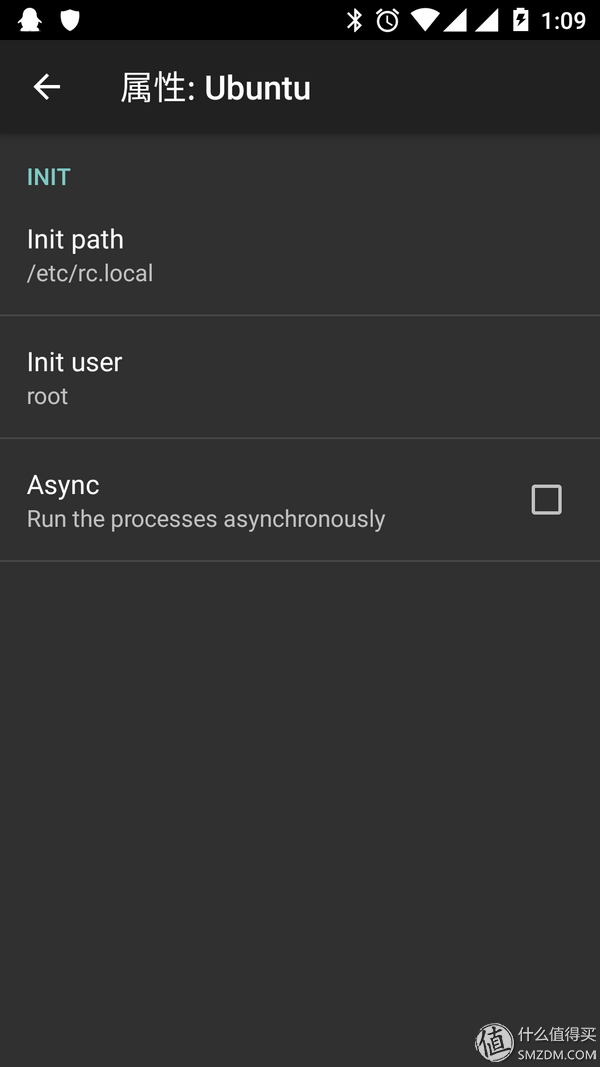
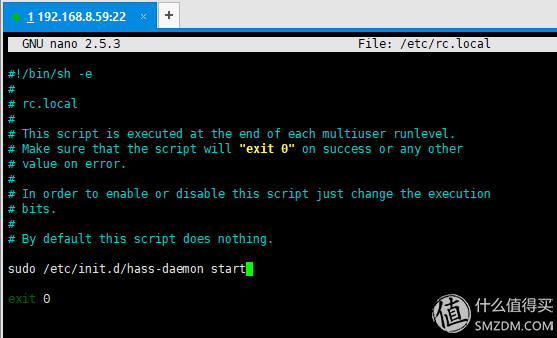
Hang out on the aunt and see this smart home article. Although there is no smart home device in the small rented place, there are still many people who are interested in watching it. First of all, this article does not teach how to install HomeAssistant, and the content aspect is just how to install it on Android devices. There is no detailed configuration method. To choose DIY, you must have enough skills and careful attention to solve the problem. If you are in trouble, you can click the x in the upper right corner of your mouse, and then you will pay for it. Although there are raspberry pies on the hands, considering that many interested valued friends are not available, share a solution using idle Android devices. The commands involved in this article are still relatively numerous, but there should be no problem in step by step. probably . The condition is that it must be root, mobile phone, tablet, and Android box are all feasible. However, taking into account the problem of running memory, it is best to run alone, do not use other purposes. The device I use is ZUK Z2 with LineageOS 14 but basic Linux Deploy support is fine. Linux Deploy's hardware requirements are a minimum of 512MB of running memory, 1GB is recommended. In addition, because of the way that Linux Deploy implements functions, improper operation may damage the system of the mobile phone itself, resulting in failure to enter the system normally, and may need to be refreshed in order to work normally. Therefore, preparations must be made for re-flashing. It is recommended to use the native system ROM such as CM, LineageOS, Mage, etc. If you use the original ROM, it is best to reset the factory settings to avoid running out of memory and kill key processes to cause instability. If ROM has various functions for clearing memory or saving power, set a whitelist to avoid Linux Deploy being killed. In terms of power supply, as long as it is not an older device, if the power supply is sufficient, it will not pass through the battery, so this aspect can still be assured. In theory, x86 Android devices are also OK, but there is no device to test on hand, so it is not guaranteed that this tutorial can operate normally. Please forgive me. First need to download the following two APP: Linux Deploy uses container-like technology to run linux distributions on Android devices such as Ubuntu and Debian. However, since the kernel still depends on the kernel of the host device, some applications may not be able to use the latest kernel (such as Docker), and the Linux kernel used by Android 7.1.1 is still 3.18. HomeAssistant is based on Python, and Homebridge is based on Nodejs, both of which can be run cross-platform. So only need to use Linux Deploy to install Linux first, and then install them to solve the problem. This article also comes with a method to modify the installation source to increase the speed of installation. The problem of slow installation on the Raspberry Pi can also be solved in the same way, hoping to help interested students. You can also choose your favorite BusyBox here, no special request. After installing BusyBox, you need to open the APP and click Install again. The installation path defaults to /system/xbin. Then click Update Environment in the settings of Linux Deploy so that the preparation is complete. How to confirm whether the environment meets the conditions? There is a need to determine that su is available. Because it is necessary to prepare the flash, adb is definitely there, and the driver is also installed. As for the adb and drive problems, please solve them by yourself. If these cannot be solved, then the proposal should not be continued because the latter is more complicated. As shown in the figure, if the command line is changed to # after the su command is executed at the end, it means that the conditions for the continuation are satisfied. If the error is reported, please resolve it by yourself. After all, how can this estimate be written separately? Root privileges must first be given and BusyBox already installed. For devices above Android 6.0, you need to give Linux Deploy access to the storage device in the application permission settings. There will be a default configuration after you open Linux Deploy, you need to modify the configuration here. Click the button that looks like a download in the lower right corner. The first is the distribution. In this case, the default Debian is changed to Ubuntu for later development. (Debian's Python version is too low, and HomeAssistant uses an async library to support Python 3.5+.) The default is on the architecture, but it can also be changed to arm64 like I did. This needs to be set based on the actual device, and the default is recommended (again - no x86 Android device is on hand). The source address can be modified to be a domestic image source. Here I use the source of China University of Science and Technology. Http://mirrors.ustc.edu.cn/ubuntu-ports/ Downwards need to pay attention to the user name and password, the default can, if you forget the user and password can also be viewed here. Check "Allow SSH server startup". After the setting is completed, return to the main interface, click the three points in the upper right corner, select the installation, and the rest is waiting. If everything goes well, you can see the <<<deployment†word indicating that the image has been built. This time will be slightly longer, about 10-30 minutes. Click the Start button and you see that the <<< start word says OK. If there is no su command found in the Starting extra/ssh, please return to the above BusyBox installation section, update the environment settings, and use adb to test if su exists. The rest of the operation requires the use of a terminal. Although it is also possible to install an APP solution, it is recommended to operate on the computer. Copy and paste commands are more convenient. On Windows, I use XShell and XFtp, which is free for home and school licenses. It is also recommended to install a text editor Notepad++, because the default file encoding on Windows is different from Linux, if you use your own Notepad is likely to cause Linux to identify abnormal. The download address of the above software should be searched on its own, or use a familiar tool instead. The address of the link is displayed on Linux Deploy and is the IP displayed at the top. This is where you accept the save key. Then just log in with the username and password in the attribute. If you forget, check it out on the app. Use XFTP to manage files directly, but link addresses need to specify the protocol sftp, a complete example: Sftp://192.168.8.59 After the connection is successful, the privileged file can be edited directly. Here are three configuration files that can be uploaded to the /home/android directory using SFTP for later use http://pan.baidu.com/s/1slVplDF Since the distribution does not have nano installed by default, it needs to be installed manually. Sudo apt-get install nano The basic operation of nano is Ctrl+O is saved, it will prompt whether to write, enter confirmation, Ctrl+X exit As I mentioned earlier, Python3 needs to be installed. The version is 3.5.1. You can enter the following command to check the version. Python3 -V Need to install Python's package manager Sudo apt-get install -y python3-pip In order to solve the slow installation problem, you need to modify the installation source of the Python package manager (pip). Sudo mkdir /root/.pip Sudo sh -c "echo '[global]nindex-url = https://mirrors.ustc.edu.cn/pypi/web/simple/' > /root/.pip/pip.conf" Update pip try installation speed Sudo pip3 install -U pip Install the python virtual environment tools you need Sudo pip3 install virtualenv First to add a user Sudo useradd -rm homeassistant Add a python runtime environment under the /srv directory. Sudo mkdir /srv/homeassistant The pip installation source that was previously modified is for the root user. Since the user running homeassistant is used, and the python package needs to be installed during the first run, it must be done once. Sudo mkdir /home/homeassistant/.pip Need to give newly created file permissions to homeassistant users Sudo chown -R homeassistant:homeassistant /home/homeassistant/.pip Then switch to the new user Sudo su -s /bin/bash homeassistant Create Python Virtual Runtime and Switch Virtualenv -p python3 /srv/homeassistant If successful, the terminal command line should appear as: (homeassistant) homeassistant@localhost:/$ Finally you can install homeassistant Pip3 install -U homeassistant Before starting homeassistant, you need to set it on Linux Deploy, otherwise it will fail to start because the user does not have network access permission. Then click on the configuration in the upper right corner of the main interface and wait for it to finish. Try to start homeassistant, it should be noted that there are actually some Python packages installed during the startup process, so you need to wait a bit. Hass See in the terminal: INFO:homeassistant.bootstrap:Home Assistant initialized in 108.88s Press Ctrl+C to exit homeassistant for the following operations. The start here is just to see if it can run normally, and configure the homeassistant after starting the running. Note: If it is followed by the above operation, please use the exit command to exit the homeassistant user Due to the way Linux Deploy is running, systemctl cannot be used to boot. Can only be added using the init.d script. Refer to the project documentation https://home-assistant.io/docs/autostart/init.d/ to add a good startup script. Or directly download the configuration file hass-daemon provided by me (note that without suffixes, edit can be opened with Notepad++.) If you use the file I provided Sudo cp /home/android/hass-daemon /etc/init.d/hass-daemon If you copy from the document, you need to create the file and edit it yourself Sudo touch /etc/init.d/hass-daemon Need to modify the two values ​​of RUN_AS and PRE_EXEC RUN_AS="homeassistant" Save the configuration file and then execute the following command Sudo chmod +x /etc/init.d/hass-daemon Finally you can manually try to start the service Sudo /etc/init.d/hass-daemon start The log output is defined in the startup script. You can view the log through the following command Tail /var/opt/homeassistant/home-assistant.log Also note that the startup script in the official documentation specifies the path to the configuration file. CONFIG_DIR="/var/opt/homeassistant" If you need to edit the configuration file you need to edit it in this directory. Of course you can also modify the default directory below CONFIG_DIR="/home/homeassistant/.homeassistant Then you need to set it up in Linux Deploy and click on the download icon icon in the lower right corner. Enable custom script execution under INIT, then confirm that the init path in the Init setting is /etc/rc.local Then edit this file in the terminal Sudo nano /etc/rc.local Add a line above exit 0 Sudo /etc/init.d/hass-daemon start This starts the homeassistant when the image starts. Since there is no smart home device on the hand, there will be no follow-up test. Theoretically speaking, it is feasible, of course, if there are good people donating a light bulb or something to give me the best test. The default is not installed curl manually installed Sudo apt-get install -y curl Use the official script to first add the installation source Curl -sL https://deb.nodesource.com/setup_7.x | sudo -E bash - Modify the installation source Sudo nano /etc/apt/sources.list.d/nodesource.list This time is the NodeSource source of Tsinghua University. It should be noted here that if it is a Raspberry Pi, please do not modify the xenial main section and keep the original value. Deb https://mirrors.tuna.tsinghua.edu.cn/nodesource/deb_7.x xenial main Install nodejs Sudo apt-get update Then there are several dependencies that are compiled for use Sudo apt-get install -y python git libavahi-compat-libdnssd-dev The npm installation is as slow as a snail. It can also be solved by modifying the source. He was always embarrassed by the wool of the University. This time he changed to Ali's father. Sudo npm install -g --unsafe-perm homebridge --registry=https://registry.npm.taobao.org I can directly install HomeBridge here. If the installation fails, follow the original steps and you should be able to solve it. Continue to install the plug-in to open HomeAssistant Sudo npm install -g homebridge-homeassistant --registry=https://registry.npm.taobao.org There is still a problem to be solved before running HomeBridge. Simply put, because of the way Linux Deploy works, a dependent service cannot be started normally, which will cause HomeBridge to fail to start. Edit the configuration file for this service Sudo nano /etc/avahi/avahi-daemon.conf You need to comment out all the parameters in publish. You can add a # to the corresponding configuration item (..... indicates the omitted content, but it is not available). ...... Then need to modify the service startup parameters Sudo nano /etc/init.d/avahi-daemon Find the d_start() section where you started the service and add the --no-drop-root parameter after $DAEMON D_start() { Here first try to manually start related services Sudo /etc/init.d/dbus start If both services start successfully, you can try to start HomeBridge manually. Homebridge is running on port 51826. If you see the above word that HomeBridge is running, you can see if you can find it in the ios home application. Similarly, because there is no smart home device on the hand, the following functions cannot be tested. You can still only start with the init.d script, and this time you need to start two dependent services first. Just like HomeAssistant, you need to add homebridge to Privileged users and reconfigure it. Also refer to the project documentation https://github.com/nfarina/homebridge/wiki/Homebridge-autostart-at-boot-(init.d)-on-Ubuntu-(linux) This time, we will not elaborate on the order. We can refer to the instructions in HomeAssistant above. Basically, we mean the same thing. Sudo useradd -r homebridge Then try to manually start homebridge Sudo /etc/init.d/dbus start Check the operation log to know the running situation Tail /var/log/homebridge.log Similarly, the service file also specifies the path to the configuration file that needs to be modified in /var/opt/homebridge. Modifying the configuration needs to restart homebridge Sudo /etc/init.d/homebridge restart Need to edit the /etc/rc.local file again to add the start command, the final file content is as follows (..... indicates omitted content, it is actually not) ...... Directly can use the command Ifconfig It should be the MAC address of the wlan0 NIC, which is behind the HWaddr Wlan0 Link encap:Ethernet HWaddr d8:9a:34:0d:89:95 It should be noted that the letter part must be capitalized when filling in the configuration file. To be honest, I don't understand what the purpose of this MQTT installation is, but looking at the installation script should be useful. This is a direct installation using the package manager. The version 1.4.8 is very similar to the 1.4.11 in the script. There should be no problem. Sudo apt-get install -y mosquitto mosquitto-clients After installation is the configuration Cd /etc/mosquitto The configuration file, account, and password use the Raspberry Pi installation script. In addition, MQTT should not be started with the image. Add it to rc.local as described above. Several tutorials from the reference did not mention the need to install shared features, the original post is only used to modify the configuration file. Since uploading modified files can be solved using XFtp, this is omitted here. Q: Why not install KODI? Q: How did you set this up? Did not see you have any lights, sensors and the like, is not to lie to the points ah? Q: How about stability? Q: What else can I do? Semiconductor Disc Devices(Capsule Type) Semiconductor Disc Devices(Capsule Type) is the abbreviation of thyristor, also known as silicon controlled rectifier, formerly referred to as thyristor; thyristor is PNPN four-layer semiconductor structure, it has three poles: anode, cathode and control pole; thyristor has silicon rectifier The characteristics of the parts can work under high voltage and high current conditions, and their working processes can be controlled and widely used in electronic circuits such as controlled rectifiers, AC voltage regulators, contactless electronic switches, inverters, and inverters. Semiconductor Disc Devices,Inverter Thyristor,Phase Control Thyristor,Capsule Type Semiconductor Disc Devices YANGZHOU POSITIONING TECH CO., LTD. , https://www.cndingweitech.com Raspberry Pi to create home center tutorial (full version) additional modifications (2017-05-01 23:38:35): To tell the truth, I don't know how many people actually follow the tutorials, but I still try to improve and update this tutorial. . First of all, the Hassbian system comes with a Home-assistant, so please use the value of the Hassbian system to skip 3.1 and go straight to 3.1.1. Second, if step 3.1.1 fails, you can install it manually. Wu Wu Niang and Di Fat | Like 153 Comments 99 Favorites 1k View Details
  Deploying a Linux system: Linux Deploy (ru.meefik.linuxdeploy)_2.0.2_Android application_Coolnet deployment Linux system: Linux Deploy (ru.meefik.linuxdeploy) 2.0.2: Deploying a Linux system is to install other Linux distributions on Android The version of the tool is naturally a good thing for those who like tossing cool friends. It should be noted that sometimes some slightly unpopular distros may not have a domestic image, and it will take more time to install it. coolapk.com direct link
  BusyBox installer (ru.meefik.busybox)_1.26.2_Android application_BusyBox installer (ru.meefik.busybox) 1.26.2: BusyBox installer Cool friend said to be very good, beautiful and stable, need busybox can try, The average user does not seem to be able to use this. Coolapk.com direct link basic environment
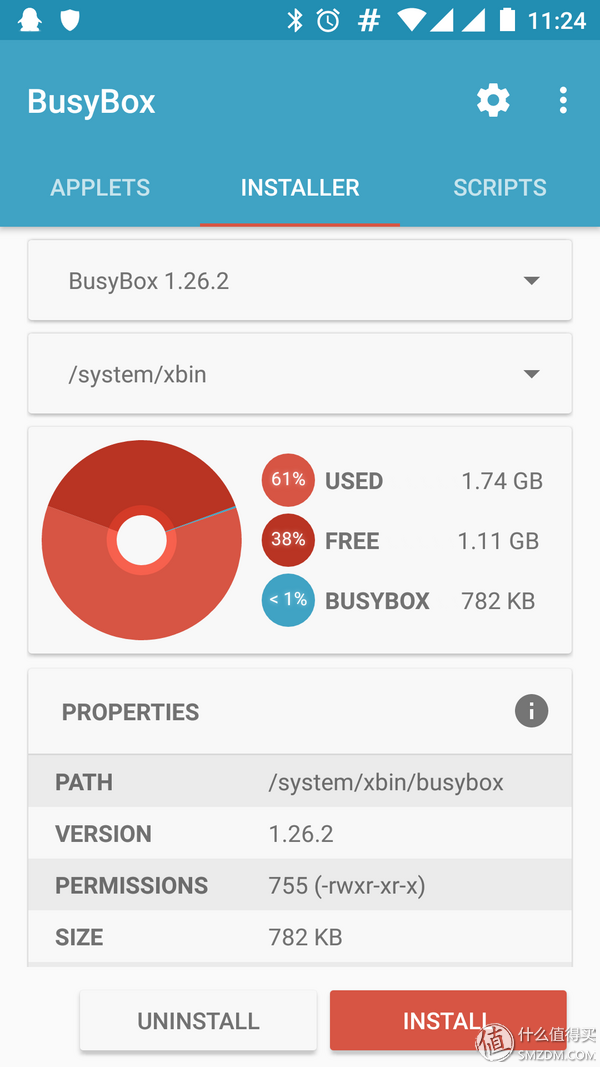

Sudo chown homeassistant:homeassistant /srv/homeassistant
Sudo sh -c "echo '[global]nindex-url = https://mirrors.ustc.edu.cn/pypi/web/simple/' > /home/homeassistant/.pip/pip.conf"
Source ./homeassistant/bin/activate
Add homeassistant in the Privileged users in the configuration, separated by spaces and default root (English half space) 
It means that the startup is successful. Then you can open http://ip_address:8123 in the browser to see the result. 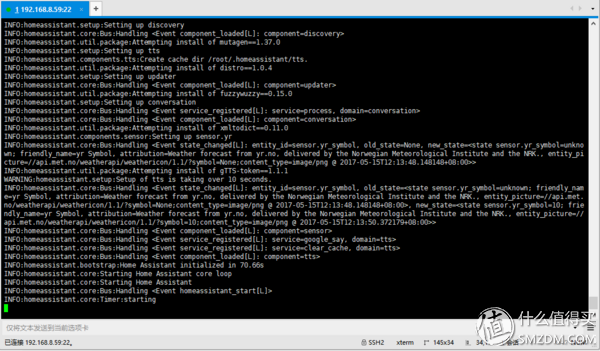
Sudo nano /etc/init.d/hass-daemon
PRE_EXEC="source /srv/homeassistant/bin/activate;"
Sudo update-rc.d hass-daemon defaults
Sudo service hass-daemon install 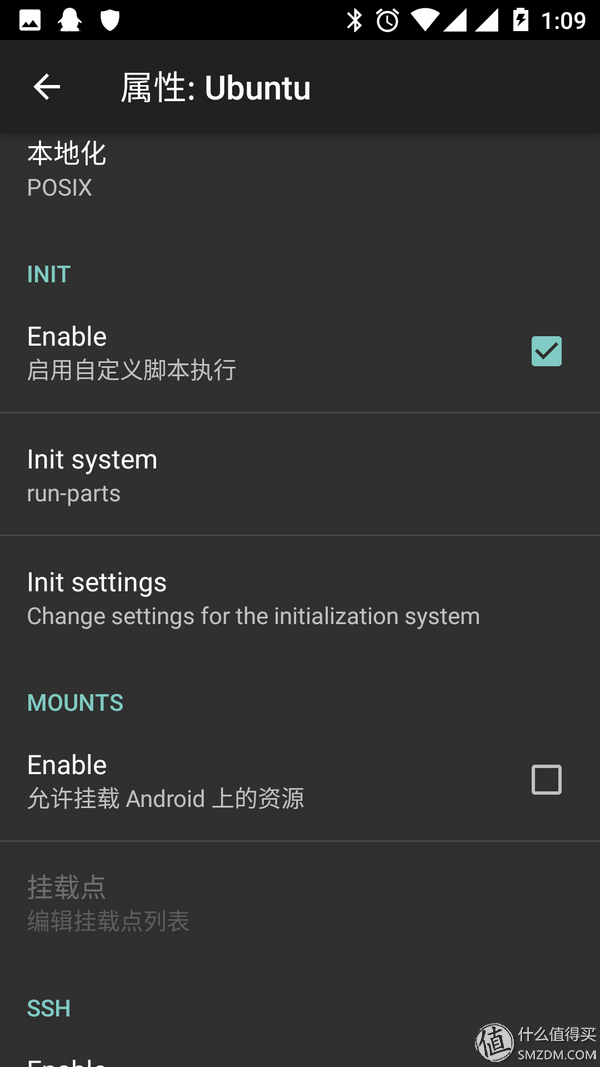
Deb-src https://mirrors.tuna.tsinghua.edu.cn/nodesource/deb_7.x xenial main
Sudo apt-get install -y nodejs
[publish]
#disable-publishing=yes
#disable-user-service-publishing=no
#add-service-cookie=no
#publish-addresses=yes
#publish-hinfo=no
#publish-workstation=no
#publish-domain=yes
#publish-dns-servers=192.168.50.1, 192.168.50.2
#publish-resolv-conf-dns-servers=yes
#publish-aaaa-on-ipv4=yes
#publish-a-on-ipv6=no
......
$DAEMON --no-drop-root -c && return 0
If [ -e $DISABLE_TAG -a "$AVAHI_DAEMON_DETECT_LOCAL" != "0" ];
# Disabled because of the existence of an unicast .local domain
Log_warning_msg "avahi-daemon disabled because there is a unicast .local domain"
Exit 0;
Fi;
$DAEMON --no-drop-root -D
}
Sudo /etc/init.d/avahi-daemon start 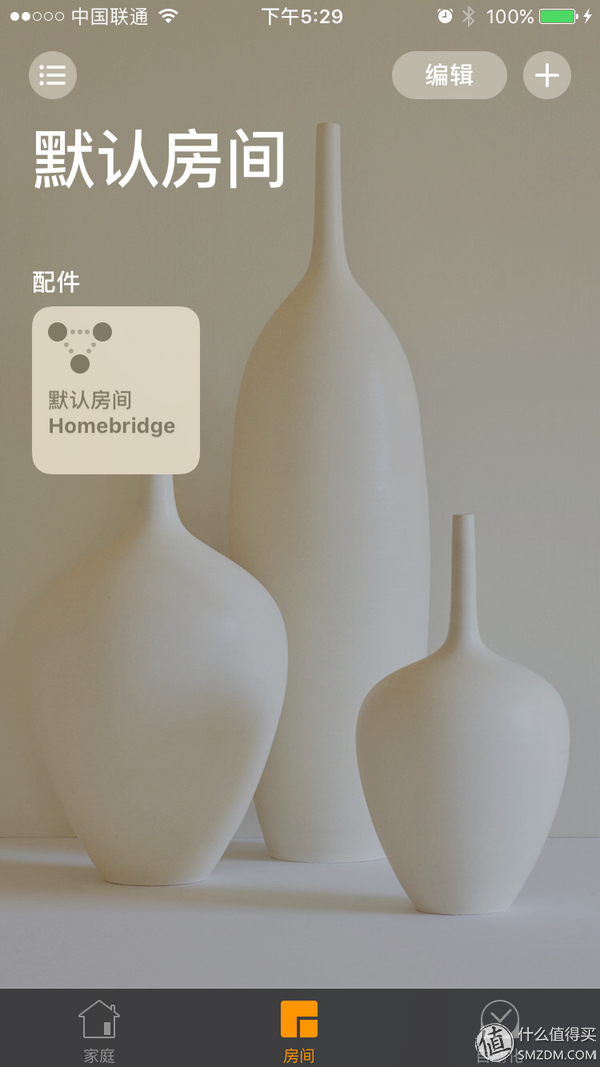
Sudo mkdir /var/opt/homebridge
Sudo cp -R ~/.homebridge/* /var/opt/homebridge
Sudo chown -R homebridge:homebridge /var/opt/homebridge
Sudo chmod -R +x /var/opt/homebridge
Sudo cp ~/homebridge /etc/init.d/homebridge
Sudo chmod +x /etc/init.d/homebridge
Sudo update-rc.d homebridge defaults
Sudo /etc/init.d/avahi-daemon start
Sudo /etc/init.d/homebridge start
Tail /var/log/homebridge.err
Sudo /etc/init.d/hass-daemon start
Sudo /etc/init.d/dbus start
Sudo /etc/init.d/avahi-daemon start
Sudo /etc/init.d/homebridge start
Exit 0
Sudo cp /home/android/mosquitto.conf /etc/mosquitto/mosquitto.conf
Sudo chown mosquitto:mosquitto mosquitto.conf
Sudo touch pwfile
Sudo mosquitto_passwd -b pwfile "pi" "raspberry"
Sudo chown mosquitto:mosquitto pwfile
Sudo chmod 0600 pwfile
Sudo /etc/init.d/mosquitto restart
If you really want to install the steps are consistent with the original post, the only thing to note is that starting the service is started with the script in /etc/init.d. Look at the feedback situation. If it is really necessary to install it, it will be added later. (Do not rule out digging without filling)
A: The system automatically kills the background when running out of memory, and hangs if Linux Deploy is killed. And KODI has android version, directly download apk installation it, no need to manually install.  Kodi (formerly XBMC)(org.xbmc.kodi)_17.1_Android Application_CoolNet Kodi (formerly XBMC) (org.xbmc.kodi) 17.1: Xiao Bian has never understood why you have such a good player, see Two footage is not necessary, ah, the general player is clear, there are sounds, this XBMC Xiaobian is not really how touched before, it looks like a stock, and this volume is large enough, looks like the decoder is very powerful . Coolapk.com Direct Links
A: Reasoning based on the TCP/IP protocol should be no problem. As for the purchase of other external equipment, the investment is relatively large, plus I myself do not have this demand, so too lazy to get.
A: The stability depends on the stability of the device itself. At present, except for the direct phone hanging up due to improper operation configuration, there is no problem in normal operation. However, the above merely represents the situation of the machines and systems in my hands. In general, it is recommended to use native ROM such as CM.
A: Because basically it is a server running Linux, leaving the kernel version limit, the software is basically what the Raspberry Pi can do. However, the advantage of the Raspberry Pi is GPIO, which cannot be replaced. Although the sensor of the mobile phone can be identified, it still needs Linux's technical ability to continue tossing. ")
No Raspberry Pi? It does not matter, the mobile phone is OK! Idle Android Devices to Build a Smart Home Hub
cause